Knowledge Base: Send a Newsletter
We’re back with another look at our updated Knowledge Base! This week, we’re taking a deep dive into the fundamentals of MNB function: Sending a Newsletter. We’re sure you know how to send already, but you might find a few surprises in the new system. Read on for more!
About This Feature
There are two ways send a completed newsletter in the MNB BETA system: the Send button found in the Newsletter Archive, and the newly added Send button on the Newsletter review page. This feature will walk you through scheduling your newsletter, selecting the recipients, and the final sending process.
How to Use This Feature
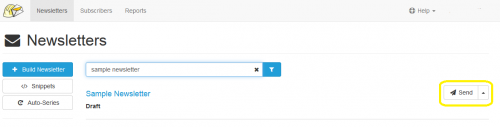
To send a newsletter that you have already saved as a draft, click to “Newsletters” in the top menu bar (right next to the hard hat and envelope icon). Locate the newsletter you want to send, click the “Send” button on the far right side of the archive table. This will take you to the Scheduler page, where you will determine when and to whom you will send the newsletter before actually turning your newsletter loose on the world. Keep in mind, however, your email may go into a sending queue for 5-10 minutes if our servers are busy.
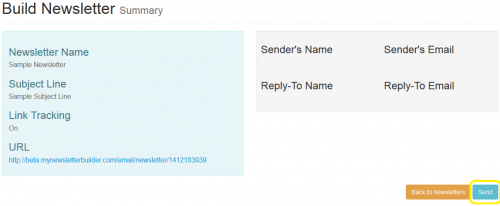
Alternatively, you can find a new “Send” button on the review screen that appears after you click “Save and Review” in the newsletter editor. This will take you directly to the scheduling page.
Step One: Pick and Schedule
Make your selection for each of the following:
Newsletter. You’ll see the newsletter name appear in great right next to the word “Schedule” at the top of the page. Verify you are about to send the correct newsletter
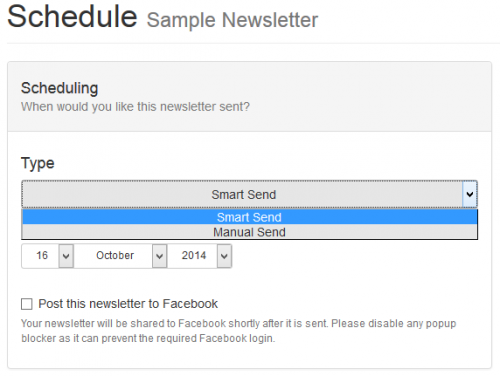
Method.
Choose between Manual and Smart Send.
- Smart Send will add your newsletter to the sending queue as soon as possible. It will most often be processed within 10 minutes. You will have the option to cancel the send until the newsletter is actually sent.
Aside: we process and send newsletters really fast. When we say fast, we mean it. If your newsletter list is less than 100k subscribers, don’t count on being able to cancel it before we’ve already sent plenty.
- Manual Send will allow you to select the date and time on which your newsletter will be sent. Simply use the drop down selection tools that appear below the sending “Type” bar. You can schedule your newsletter to send as far in advance as December of the following year. If you need to edit the newsletter prior to the scheduled sending date, you will need to cancel the send, make your edits, and then reschedule.
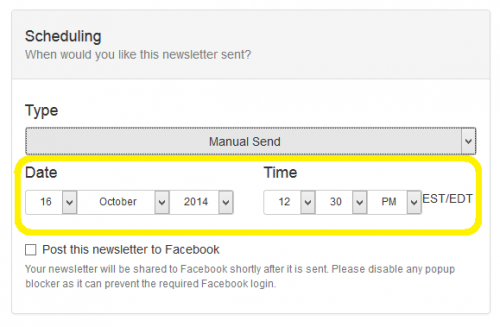
Post to Facebook. Checking this box automatically posts your newsletter to Facebook shortly after it is sent. Please make sure your pop-up blocker is set to allow pop-ups. Note: You must have an existing Facebook account to activate this feature.
Step Two: Group Selection
On the right side of the screen, you’ll see the “Subscriber Lists” selection table. This is a list of all subscriber lists you have set up and populated within your MNB account. Check the boxes next to each group that you would like to receive your newsletter. You can see the total number of subscribers who will receive the newsletter at the bottom of this column. If you select multiple lists, the system will automatically identify any duplicate email addresses shared between those lists, and remove them to eliminate the risk of sending multiple copies of the same email newsletter to a single subscriber.

After you’ve selected your groups, you’ll be able to choose whether or not you want to Send only to confirmed subscribers. If you check this box, your newsletter will only be sent to subscribers that are confirmed via opt-in through the MNB system.
Finally, you have the option to set the selected newsletter as a “Welcome Newsletter” which will be automatically issued to any new subscribers to the list of your choosing.
When you’re ready, click the blue “Send” button on the bottom right, and you are good to go! You can view the status of your newsletter in your Newsletter Archive.

Aftermath
Once you’ve clicked send, you’ll be taken to the send review page. There you’ll see the option to adjust your sending schedule, preview the newsletter, and copy the newsletter to send again at a later date.

Best Uses
Sharing your newsletters with the world! We highly recommend that you only send emails to those who have opted-in to receive communications from you. If you have a social media presence, posting to Facebook is a great way to take advantage of a potentially new audience.