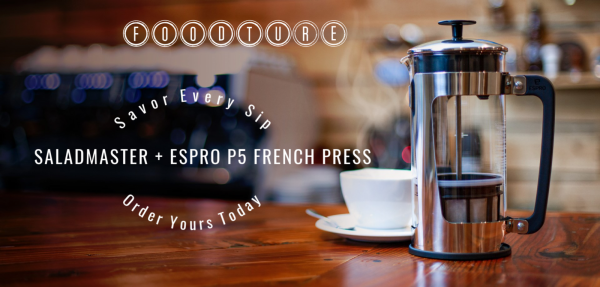
Saladmaster + ESPRO P5 French Press
|
• 32 Ounce Capacity
• Saladmaster press includes both coffee and tea filters
• Filter Technology & Isolated Chamber
• Glass Vessel & Stainless Steel Cage
• Insulated Lid
• The coffee filters twist to unlock for easy separation
• Safety Lock™ - patent-pending system secures the glass vessel inside the steel cage while pouring and also allows for easy, removal and cleaning.
Introducing the Saladmaster P5, the second product in our collaboration with ESPRO. This beautiful press is an evolution of the classic French-press that is crafted to elevate the coffee and tea experience by providing cleaner, more consistent flavor – ensuring you can brew your best cup.
ON SALE $65.00 Plus shipping & tax
Email to Order or call 707 837-2729
Masala Chai
Ingredients
1 ½ cup water
½ inch fresh ginger, thinly sliced or grated cone #1, or ⅛ teaspoon ground ginger
½ teaspoon fennel seeds, or ⅛ teaspoon fennel powder
1 cinnamon stick, or ¼ teaspoon ground cinnamon
4 cardamom pods, peeled open , or ⅛ teaspoon ground cardamom
4 cloves, or ⅛ teaspoon ground clove
Pinch of ground black pepper
Pinch of sea salt
2 teaspoons loose black tea, or 2 tea bags
½ cup nut milk oat or almond
2 teaspoons maple syrup or sugar or 2 drops stevia, to taste
Instructions
Boil water in electric tea kettle / stove top tea kettle. Put all the spices, ginger, cardamom, fennel, cloves, cinnamon, black pepper, tea and salt in the P5 French Press. Let it steep for 10 mins allow the water to infuse the flavors. Warm the oat milk in the 1qt saucepan. Pour tea into warmed milk & add sweetener
Serve immediately.
40 % off Tea Kettle Stove-top or Electric
Turmeric Latte (Golden Milk)
Creamy turmeric latte, also known as golden milk or turmeric milk, is a delicious warming Indian beverage. Made with hints of warming spices, you'll love this simple recipe with a handful of ingredients.
Ingredients
2 cups almond milk
1/4 teaspoon ground turmeric
1/2 inch fresh ginger, grated, or 1/8 teaspoon ground ginger
pinch of ground cinnamon
pinch of black pepper
1 teaspoon honey, or maple syrup or 2 drops liquid stevia
Optional Toppings:
dried rose petals
Ground cinnamon
Instructions
In the 1 Qt saucepan, whisk milk, turmeric, cinnamon, ginger, and black pepper. Bring to a boil.
Lower the heat and simmer the mixture for 5 minutes. Turn off the heat and add sweetener, if using.
Using a strainer, divide the turmeric milk into two cups.*
Notes
*To create a frothy beverage, use a milk frother or pour the mixture into a blender and blend until frothy. Note that turmeric will stain your blender, so immediately rinse it with soap and warm water.
|
|
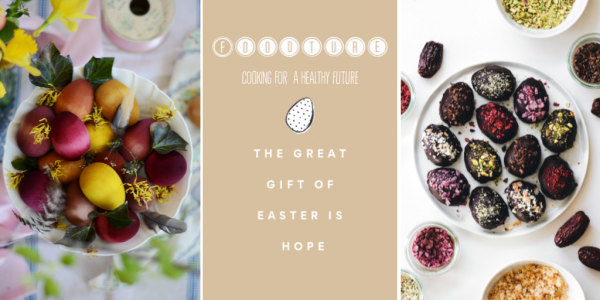
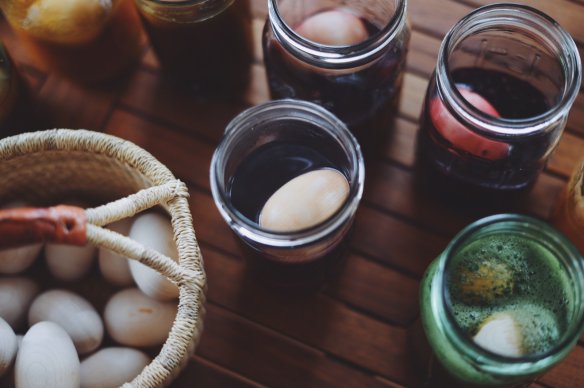
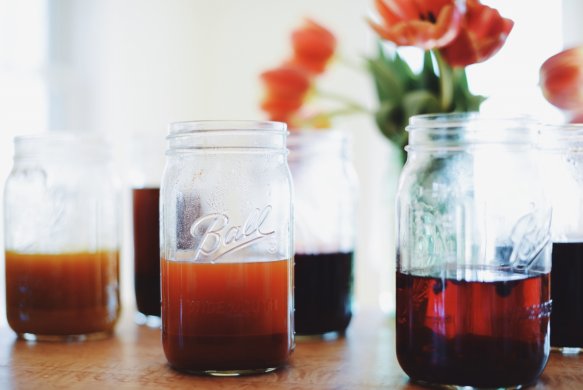
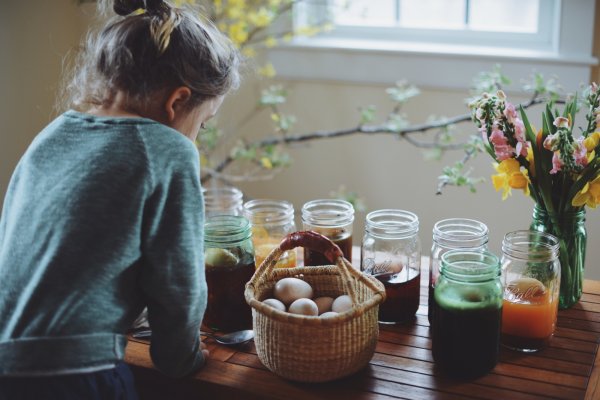
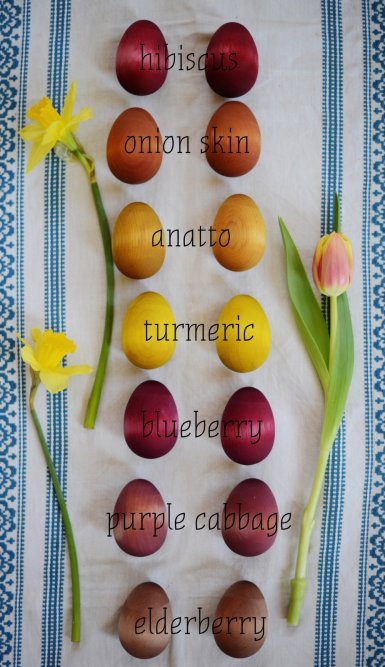
Naturally Dyed Wooden Easter Eggs
|
I love using wooden eggs to dye for Easter- You can buy them here
hibiscus dye
4 tablespoons dried hibiscus flowers
2 cups boiling water
1 tablespoon distilled white vinegar
method: add hibiscus to a jar, pour in boiling water then vinegar, then stir. add wooden eggs to jar and weigh them down with a flat wide rock or object. let eggs soak in dye for at least 1 day, up to 3 days. then remove eggs, rinse under the tap and pat dry with a towel. eggs will dry out and color will fade slightly over time. hibiscus produces a bright dark pink and fades to more of a red.
anatto dye what is it?
2 tablespoons anatto powder
2 cups boiling water
1 tablespoon distilled white vinegar
method: add anatto powder to a jar, pour in boiling water then vinegar, then stir. add wooden eggs to jar and weigh them down with a flat wide rock or object. let eggs soak in dye for at least 1 day, up to 3 days. then remove eggs, rinse under the tap and pat dry with a towel. eggs will dry out and color will fade slightly over time. anatto produces a pale orange-yellow.
turmeric dye
2 tablespoons turmeric powder or grated fresh root
2 cups boiling water
1 tablespoon distilled white vinegar
method: add turmeric powder to a jar, pour in boiling water then vinegar, then stir. {if using fresh root-simmer in boiling water for 5 minutes then add to jar} add wooden eggs to jar and weigh them down with a flat wide rock or object. let eggs soak in dye for at least 1 day, up to 3 days. then remove eggs, rinse under the tap and pat dry with a towel. eggs will dry out and color will fade slightly over time. turmeric produces a bright warm yellow.
onion skin dye
2 big handfuls of yellow or red or a combo of onion skins
2 cups boiling water
1 tablespoon distilled white vinegar
method: simmer onion skins for 5 minutes, strain liquid into a jar and make sure to squeeze out liquid from the skins (when cool to the touch), then add vinegar, then stir. add wooden eggs to jar and weigh them down with a flat wide rock or object. let eggs soak in dye for at least 1 day, up to 3 days. then remove eggs, rinse under the tap and pat dry with a towel. eggs will dry out and color will fade slightly over time. yellow onion skins produce a burnt orange color. red onion skins will produce more of a reddish hue. i used a combo of the two.
blueberry dye
1/2 cup frozen or fresh blueberries
2 cups boiling water
1 tablespoon distilled white vinegar
method: add blueberries to a jar, pour in boiling water then vinegar, then muddle the blueberries with the back of a spoon. add wooden eggs to jar and weigh them down with a flat wide rock or object. let eggs soak in dye for at least 1 day, up to 3 days. then remove eggs, rinse under the tap and pat dry with a towel. eggs will dry out and color will fade slightly over time. blueberries produces a bright fuchsia and fades to more of a purple color.
purple cabbage dye
4 cups chopped purple/red cabbage
2 cups boiling water
1 tablespoon distilled white vinegar
method: simmer cabbage for 5 minutes, strain liquid into a jar and make sure to squeeze out liquid from the cabbage (when cool to the touch), then add vinegar, then stir. add wooden eggs to jar and weigh them down with a flat wide rock or object. let eggs soak in dye for at least 1 day, up to 3 days. then remove eggs, rinse under the tap and pat dry with a towel. eggs will dry out and color will fade slightly over time. purple cabbage produces a pale violet color.
elderberry dye
1/2 cup dried elderberries
2 cups boiling water
1 tablespoon distilled white vinegar
method: simmer elderberries for 5 minutes then both liquid and berries to jar. add vinegar and stir. add wooden eggs to jar and weigh them down with a flat wide rock or object. let eggs soak in dye for at least 1 day, up to 3 days. then remove eggs, rinse under the tap and pat dry with a towel. eggs will dry out and color will fade slightly over time. dried elderberries produce a brown with a slight hint of purple. i would use fresh or frozen if done again.
yellow dock dye
4 tablespoons dried yellow dock root
2 cups boiling water
1 tablespoon distilled white vinegar
method: simmer yellow dock in boiling water for 5 minutes, then add both liquid and root to jar. add wooden eggs to jar and weigh them down with a flat wide rock or object. let eggs soak in dye for at least 1 day, up to 3 days. then remove eggs, rinse under the tap and pat dry with a towel. eggs will dry out and color will fade slightly over time. dried yellow dock root produces a very pale yellow. i would use fresh next time. (results are not even pictured because it was so pale)
|
|
Naturally Dyed Easter Eggs
|
Bluish-Gray Mix 1 cup
frozen blueberries with 1 cup water, bring to room temperature, and remove blueberries. Add 3 tsp. white vinegar.
Blue
Cut 1/4 head of red cabbage into chunks and add to 4 cups boiling water. Stir in 2 Tbsp. vinegar. Let cool to room temperature and remove cabbage with a slotted spoon.
Jade Green
Peel the skin from 6 red onions and simmer in 2 cups water for 15 minutes; strain. Add 3 tsp. white vinegar.
Faint Green-Yellow
Peel the skin from 6 yellow apples. Simmer in 1-1/2 cups water for 20 minutes; strain. Add 2 tsp. white vinegar. Simmer 4 oz. chopped fennel tops in 1-1/2 cups of water for 20 minutes; strain. Add 2 tsp. white vinegar.
Orange
Take the skin of 6 yellow onions and simmer in 2 cups water for 15 minutes; strain. Add 3 tsp. white vinegar.
Faint Red-Orange
Stir 2 Tbsp. paprika into 1 cup boiling water; add 2 tsp. white vinegar.
Yellow
Rich yellow:
Simmer 4 oz. chopped carrot tops in 1-1/2 cups water for 15 minutes; strain. Add 2 tsp. white vinegar.
Mustard-yellow:
Stir 2 Tbsp. turmeric into 1 cup boiling water; add 2 tsp. white vinegar.
Various shades:
Steep 4 bags of chamomile or green tea in 1 cup boiling water for 5 minutes.
Pale yellow:
Chop 4 oz. goldenrod and simmer in 2 cups water for 20 minutes; strain. Add 2 tsp. white vinegar.
Faint yellow:
Simmer the peels of 6 oranges in 1-1/2 cups water for 20 minutes; strain. Add 2 tsp. vinegar.
Brown-Gold
Simmer 2 Tbsp. dill seed in 1 cup water for 15 minutes; strain. Add 2 tsp. white vinegar.
Brown
Add 1 tablespoon vinegar to 1 cup strong coffee.
Pink
Faint pink:
Chop 4 oz. amaranth flowers and simmer in 2 cups water; strain. Add 2 tsp. white vinegar. Simmer the skins from 6 avocados in 1-1/2 cup water for 20 minutes; strain. Add 2 tsp. white vinegar. Mix 1 cup pickled beet juice and 1 tablespoon vinegar.
Dark pink:
Cut 1 medium beet into chunks and add to 4 cups boiling water. Stir in 2 Tbsp. vinegar and let cool to room temperature; remove beets.
Lavender
Mix 1 cup grape juice and 1 tablespoon vinegar.
|
|
How to cook Eggs in Saladmaster
|
 Boiled Eggs without water- Boiled Eggs without water-
Place a couple folded wet paper towels in the bottom of the pan ( 1 qt or 11 inch skillet depending on the quantity) place whole eggs on top of wet paper towels, start on medium low heat, then drop heat to low when clicking happens cook 5-15 min ( depending on quantity).
Cooking Easter Eggs
(boiled eggs without water)
Video Here
Saladmaster EGGS 3 ways- link
|
|
We would love to help you!
Are you are needing help with your Saladmaster products & cookware?
Questions about using the Saladmaster Machine?
Burning, cleaning, sticking, and general cooking questions?
Please reach out we are scheduling zoom calls to help you cook.
We will have your Consultant contact you. Email us |
|
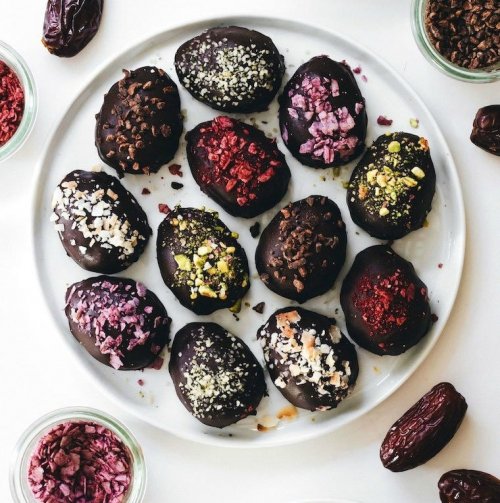
Medjool Date Peanut Butter Eggs
Ingredients
200g Medjool Dates (about 12 or 1 cup packed)
2/3 cup water
1/2 cup peanut butter (or nut/seed butter of choice*)
1 cup coconut flour**
1/2 tsp salt
4oz dark chocolate, melted***
Instructions
Blend the dates and water until smooth. In a food Processor or blender
Add the peanut butter and blend again.
Transfer to a bowl. Stir in coconut flour and salt.
Press into a silicone egg mold. Or shape into egg shapes Freeze for 30 minutes.
Flip/remove from the mold.
Use 1 qt sauce pan and melt chocolate chips over lowest heat
Coat in melted chocolate.
Sprinkle with toppings of choice (hemp seeds, cacao nibs, colored shredded coconut, chopped nuts, sprinkles, etc.)
Refrigerate until the chocolate is set (a few minutes). Enjoy!
Notes
*Use almond butter or sunflower seed butter.
**You may need less/more depending on the consistency of your peanut butter.
***Or I even like them coated with unsweetened chocolate because the filling is quite sweet.
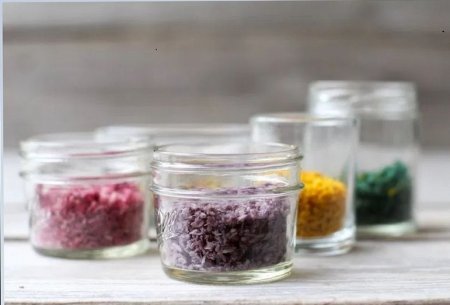
Homemade Coconut Sprinkles
Ingredients
Pink
1/4 cup frozen raspberries (or for an even brighter pink, pitaya puree)
1/4 cup unsweetened shredded coconut
Purple
1/4 cup frozen blueberries
1/4 cup unsweetened shredded coconut
Yellow
1/2 tsp ground turmeric
1 tbsp water
1/4 cup unsweetened shredded coconut
Green
1/4 tsp spirulina
1 tbsp water
1/4 cup unsweetened shredded coconut
Blue
2 tsps Homemade Natural Blue Food Coloring
1/4 cup unsweetened shredded coconut
Orange
1–2 tbsps carrot juice
1/4 cup unsweetened shredded coconut
Instructions
For the pink and purple: Let berries unthaw to defrost.
Press through a sieve to get out the juice.
Add the coconut. Mix to coat.
Spread on a baking pan lined with parchment paper.
For the yellow and green: Mix the spirulina/turmeric with the water.
Add the coconut and stir to coat.
Spread on a baking pan lined with parchment paper.
Bake on your oven’s lowest temp for 1 hour to 1 hour 15 mins. Or use dehydrator and no-bake options in the post.
Keep in an airtight container for up to 3 months.
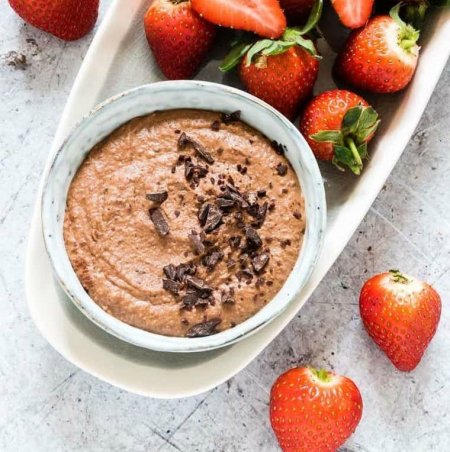
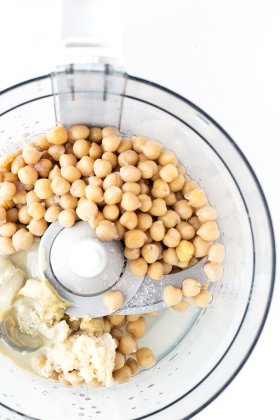
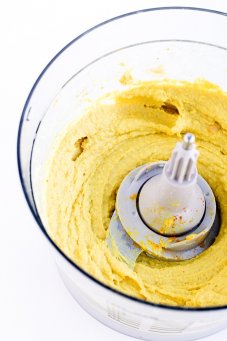
Easy Chocolate Hummus
Ingredients
(14 oz) can cooked chickpeas rinsed and drained
2 tbsp almond butter or peanut butter
1/2 cup almond milk (extra 3-4 tbsp if using a blender)
2 tbsp maple syrup or more to your taste
1 tsp vanilla extract or 1/2 tsp ground cinnamon
Shake of Sea Salt -
2 tbsp unsweetened cocoa powder
(1.5 oz) dark chocolate chopped small (if you want a smoother hummus then grate chocolate)
Instructions
Add all the ingredients through to the cocoa powder into a high-powered food processor or blender and whiz for a minute. (If using a blender, you will need to add an extra 3-4 tbsp milk to get the blender going.)
Then add in the chocolate pieces and blend into the consistency you desire.
If you want your hummus less thick then add in a bit more milk.
Roasted Radishes
How to make roasted radishes
What I love about this recipe is how simple it is to make.
- Preheat the Electric Skillet 425°F.
- Prepare ingredients: Cut off the green tops and rinse the radishes. You do not need to be peeled. Slice each in half. If it’s on the larger size, slice each half again.
- Season: In a medium bowl, toss with avocado oil, salt, pepper, and garlic. Place a single layer in the Electric Skillet or a stove top skillet
- Roast: Roast for 25 minutes with lid on, stirring them occasionally.
- Check doneness: Remove from the skillet and make sure they are cooked through. They should be crispy on the outside and tender on the inside. Cook them for an additional 5 to 10 minutes, if needed.
- Garnish and serve: Transfer them to a serving dish and toss with fresh parsley and drizzle with lemon juice. Serve immediately.
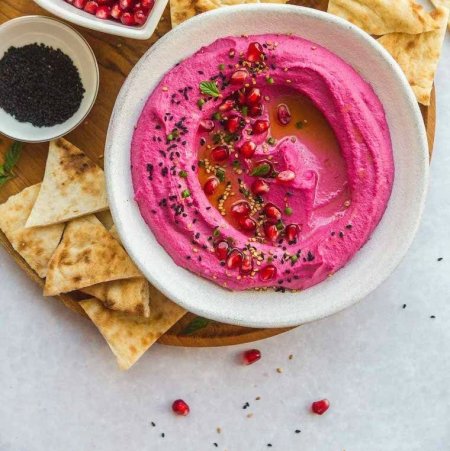
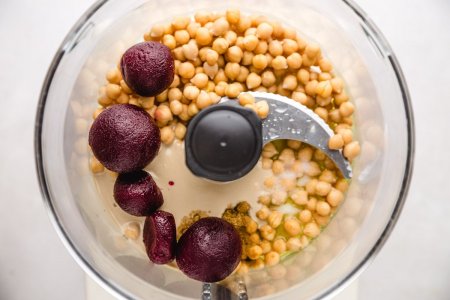
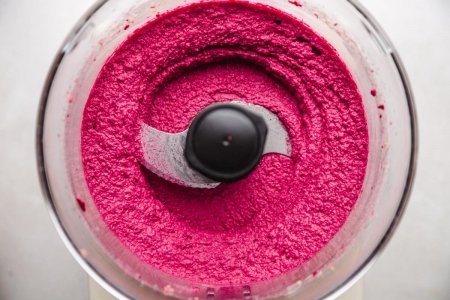
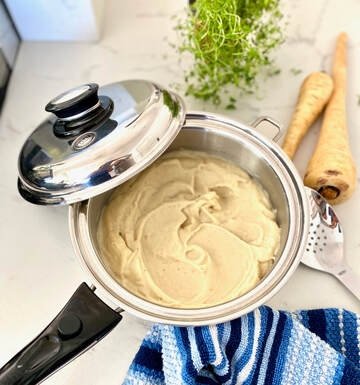
Beet Hummus
1 medium beet cooked
1 can chickpeas or 1 cup of cooked chickpeas
2 cloves garlic
2 tbsp lemon juice
2 tbsp olive oil
¼ tsp ground black pepper
pinch of salt
Instructions
In a food processor, add all ingredients and blitz until smooth.
How to cook beets in Saladmaster
Place whole beets in 2qt with 4 T water, medium click low- cook 25-35 mins
Or use 3 qt with culinary basket- make sure to put enough water in 3 qt, 2 Cups. Put beets in basket, place lid on and cook medium click low.
If the dip is too thick, add a little bit of water and blend again. Have a taste, and adjust seasonings/garlic to your preference.
Serve in a bowl, add a little of olive oil and garnish with pomegranate seeds, fresh herbs, nigella seeds, sesame seeds, etc.
What to serve beet hummus with?
Toasted pita chips.
Veggie sticks such as celery, cucumber, carrot.
Olives.
Crackers.
Spread on toast!
Add to a buddha bowl.
Deviled Potato Bites
You can roast the potatoes in the oven for a crispy result or stove-top bake.
Ingredients
15 small Salad Potatoes, halved
2 teaspoons Oil
Salt, to taste
1 14oz can Chickpeas, drained
1 tablespoon Lemon Juice
1 1/2 teaspoons Minced Garlic
1 teaspoon Dijon Mustard
1 teaspoon Turmeric
1 teaspoon Maple Syrup
1/4 teaspoon Cayenne Pepper
1 1/2 tablespoons Tahini
3 tablespoons Water
Salt/Pepper, to taste
Smoked Paprika
Chives
Instructions
Preheat oven to 400 degrees f . Place halved Potatoes on a baking sheet. Sprinkle with oil and salt, and toss to coat. Arrange Potatoes cut side up and roast at for 40 minutes, or until soft.
Let potatoes cool for 5 minutes and then scoop out a small section in the middle of the Potatoes to create a cavity. Save scooped out Potato to add into Hummus.
In a food processor, combine all the ingredients for the Hummus, including the reserved scooped out Potato and blend till smooth and creamy.
Spoon mixture into a piping bag fitted with a star tip, and pipe into the cavities in the Potatoes.
Sprinkle with Smoked Paprika and chopped Chives. Serve warm.
Or cook on top of the stove
Stove top Potato
In large 11 inch skillet place a damp paper towel, place potatoes on top. cook medium click low
Until tender 20-30 mins.
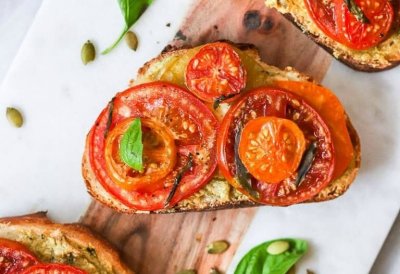
Roasted Heirloom Tomato & Vegan Pumpkin Seed Pesto Toasts
Ingredients
Vegan Pesto Spread
1/2 cup raw cashews (covered and soaked in water for at 3–4 hours at room temperature or 6–8 hours in the fridge)
1/4 cup water
1/4 cup nutritional yeast
2 Tbsp olive oil
2 Tbsp raw pumpkin seeds
1 tsp lemon juice
1 garlic clove
1/4 cup loosely packed fresh basil
Toast & Toppings
6 1/2 inch thick slices gluten-free bread (or bread type of your choice)
3–4 medium heirloom tomatoes
3–4 mini heirloom tomatoes
1 Tbsp olive oil
1 tsp garlic powder
handful fresh basil (*extra to top the baked toasts)
Instructions
Vegan Pesto
Add the soaked cashews and water to a small blender and blend together until a smooth paste is formed. Next, add in the nutritional yeast, olive oil, pumpkin seeds, lemon juice, and garlic. Blend to combine. As the last step, add in the fresh basil and blend to combine, scraping down the sides as needed.
Making the Toasts
Preheat your oven to 400F.
Slice your bread into 6 1/2 inch thick slices and top each slice with about 2 Tbsp of the pesto. Cut your tomato slices into 1/4 inch thick slices and stack on top of the toasts so that they are layered.
Drizzle 1 tbsp of olive oil, 1 tsp garlic powder, and salt and pepper to taste on top of the tomato toasts before baking. Add to the oven and bake for 20-25 minutes until the toast is beginning to brown and the tomatoes are beginning to caramelize.
Remove from oven, top with fresh basil, and enjoy!
Creamy Dreamy Parsnip-Cauli Puree
We love this puree topped with our mushroom ragout.
1½ Tbsp coconut oil
1/2 medium onion, diced, cone #3
fine sea salt
freshly ground pepper
4 C grated parsnips (about 3/4 LBS) cone #3
4 C grated cauliflower cone #3
3 C water 1 veggie bouillon cube (1 tsp), (we love Rapunzel)
1/4 C coconut milk
2 Tbsp vegan butter, such as Miyokos cultured cashew “butter”
pinch of grated nutmeg and white pepper
Directions:Preheat large skillet to medium heat. Add oil followed by the onions and season with salt and pepper. Cook onions until translucent and lightly brown, about 10 minutes. Add the parsnips, cauli, water, and veggie cube. (If veggie cubes are low-sodium, add additional salt.)Bring to a boil and then reduce to a simmer. Cover. Cook until parsnips and cauliflower are tender,8-10 minutes. Strain the parsnip-cauli mixture and set the broth aside. Add the parsnip and cauli mixture to a high-speed blender. Add the butter, coconut milk and 1/4 C of the reserved broth. Season with freshly grated nutmeg and S & P to taste. Blend until smooth. Add a little more broth, if needed, to create desired texture. Makes 31/2-4 C. Serves 4Note: The remaining broth is delicious to drink warmed. Note: White pepper is a yummy compliment to black pepper and nutmeg. If you aren’t familiar with it, we highly recommend stocking your pantry with it. Recipe by Sara & Mary
|
|
Ingredients
- 12 cups / 2 3/4 liters filtered water
- 1 tsp sesame oil or extra-virgin olive oil
- 1 red onion quartered (with skins)
- 1 garlic bulb smashed
- 1 chilli pepper roughly chopped (with seeds)
- 1 thumb-sized piece of ginger roughly chopped (with skin)
- 1 cup greens such as kale or spinach
- 3-4 cup mixed chopped vegetables and peelings I used carrot peelings, red cabbage, fresh mushrooms, leeks and celery
- 2 cups mushrooms
- 30 g dried wakame seaweed
- 1 tbsp peppercorns
- 2 tbsp ground turmeric
- 1 tbsp coconut aminos (see notes)
- A bunch of fresh corriander or other herb of your choice
- (optional) 1/4 cup nutritional yeast flakes for extra flavour and vitamins
Instructions
- Simply add everything to a large pot 7Qt or 10 QT. Bring to a boil then simmer, with the lid on, for about an hour.
- Once everything has been cooked down, strain the liquid into a large bowl.
- Serve immediately with some fresh herbs, for decoration or cool for later. It also freezes well.
Collagen? Vegetable broths vs Bone Broths
Our bodies can’t even digest collagen whole. We simply absorb the nutrients from our food which provides our bodies with the building blocks it needs to naturally create collagen, if and when it needs it.
Eating collagen does not equal having more collagen. As put in this article from TIME magazine, “Just as the dietary fat you swallow doesn’t directly translate to body fat, swallowing collagen doesn’t become collagen in or between your bones.”
In this article by NPR, they quote Kantha Shelke, a food scientist who says “Eating a diet rich in leafy green vegetables is ideal. Plants offer richer sources in collagen building blocks and, in addition, provide nutrients not found in sufficient quantities in meats or broth.”
Healing the stomach lining
And as for it being healing for the stomach lining, particularly from the gelatin, there are some great plant-based sources for that too. Particularly fermented foods. Foods high in omega 3 like flax and chia seeds. Because Gelatin and animal collagen are full of Glyphosate, is the active ingredient in the pervasive herbicide Roundup®. Animal bones are found to have high amounts of lead and other heavy metals.
Lead is stored in animal bones and thus it was hypothesized that the lead concentration in bone broths would greatly exceed that of tap water. ... The tap water used to make the broths had 89 parts per billion of lead. The bone broth contained 700 parts per billion and the skin and cartilage broth contained 950 parts per billion.
A study was recently published in the journal Medical Hypotheses raising concerns of lead contamination in commercially-available bone broths. Lead toxicity in humans can cause reproductive and gastrointestinal problems, neuropathy, anemia, abdominal pain, memory impairment, and depression, and recent studies suggest that even small amounts of lead exposure can cause trouble.
Lead Contamination in Bone Broth video here
There are many other foods that have been shown to contribute towards healing the stomach lining and digestive tract, such as seaweed, aloe vera, healthy fats and turmeric.
Vitamins and minerals
Obviously, all the calcium, potassium and other minerals found in bone broth are more than easy to find in plant-based foods plus they contain much, much more goodness.
So the animal product-reliant parts are kind of useless… Or at the very least, unnecessary and over-hyped. It’s all in aid of making what our bodies already naturally produce and plant-sourced vitamins and minerals are the best option to actually help it do that.
A Plant-Based Option Works The Same (If Not Better)
So now we’ve established that the bones in this healing broth are not only unnecessary but also not as nutritious as plant-based sources, it seems pretty clear that using a bunch of wholesome plant-based ingredients is going to be WAY more healing. And way more appealing, too.
There is no evidence of the healing benefits of slow-cooking or broth, in general. It doesn’t do much to enhance the nutrients but there is definitely something that feels healing when drinking broth. It’s warming, it’s comforting, it’s full of goodness and it tastes good.
The bottom line though is that we shouldn’t be relying on a broth to heal our gut! Because that’s silly. Also, many foods that help heal the gut need to be eaten raw (such as fermented foods and cabbage juice) so adding them to a broth is counter-productive.
But the aforementioned benefits are good enough reason to make it. Plus, it’s delicious and a great way to use up peelings, scraps and leftovers.
Vegan Bone Broth Alternative
This version contains lot’s of nutritional goodness that is great for overall health but particularly focuses on plenty of gut-healing properties. Feel free to switch up, leave out or add in any ingredients you like, to suit your diet and taste.
The main stars are:
- Wakame seaweed: Great source of omega 3 – one of the best for vegans, great for intestinal health, full of vitamins and minerals (particularly good source of iron, calcium, magnesium and iodine). Not suitable for SCD diets, leave out as necessary.
- Shiitake mushrooms: Gives the most amazing, comforting flavour. Full of vitamins and minerals (great source of vitamin D – especially if sun dried, zinc and B vitamins). Contains all essential amino acids. Prebiotic.
- Olive oil: Healthy fats with a good omega ratio that help absorb nutrients.
- Turmeric: Powerful anti-inflammatory plus adds delicious flavour and a beautiful colour.
- Spinach or kale: Full of vitamins and minerals (particularly high in Vitamins K, A and C, magnesium and calcium). Also a good source of protein and omega 3. Prebiotic.
- Coconut aminos: Mainly used for flavour but also gives the benefit of it’s amino acids. May not be suitable for some diets as it’s considered a sugar, so leave out if necessary.
|
|
Refer a Friend for a Virtual Demo
|
How to Host a Virtual Saladmaster Nutrition & Cooking Demo
|
|
We would like to offer you an opportunity to earn some Saladmaster products by referring your friends, family, and colleagues to our live virtual nutrition & cooking demo in the convenience of their home on Zoom.
All you have to do is successfully invite (3) couples/partners to our 1.5-hour nutrition & cooking demo and you will earn a high-quality gift from our company (see options below). We will schedule each couple/group separately and set up a date & time to meet them on a Zoom video call. You're welcome to participate in the zoom video call and we encourage it!
No Cost to them or you
Our advertising promotion is a great education about healthy non-toxic cookware and cooking methods that retain more nutrition in cooked meals. There are no gimmicks or catches.
FREE Hosting Gift!
When you refer 3 separate live virtual nutrition & cooking demos, you will earn a gift.
You will receive the gift after the 3 virtual demos have been completed. You will receive a piece of the highest quality kitchen equipment available anywhere (valued at up to $450-$500) as a free hosting gift!
There is no obligation ... as long as you refer 3 successful live virtual nutrition & cooking demos, you will get your gift, guaranteed.*
Here’s What We Do
- We will send an email invite and call your referral couples to set up a time & date.
- We will do an interactive zoom video call with the ouples you referred.
- We will share valuable nutritional information and conduct a carrot test.
- We will conduct an unforgettable cookware toxicity test. We will instruct the guests do this test in their own cookware in their kitchen.
- We will cook & share some healthy recipes.
- After the 3 separate virtual demonstrations have been completed, you will receive a "Thank You" gift for helping us advertise! email us to set up a virtual
|
|
|
|
|
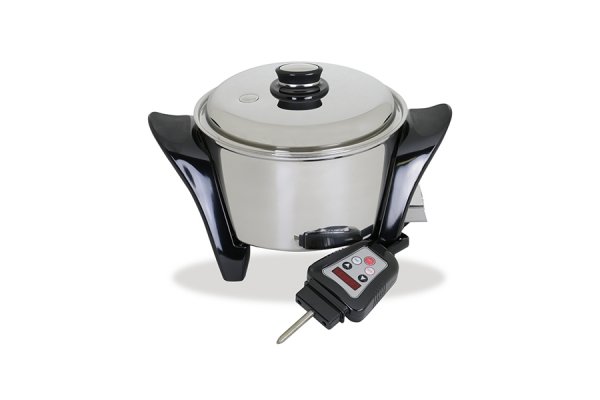
How to use your Electric Skillet & MP5
|
With Recipe/Instruction Cook booklet: Turns your liquid oil core electric skillet into an automatic Rice Cooker, Slow Cooker, Crockpot, Baker, Roaster, Griddle, Deep Fryer, Popcorn Popper and it even browns.
Operating Instructions: Insert automatic control into appliance. Plug in electric outlet and a red sign light with appear on the right side of the display. CAUTION: Always operate appliance at least 4 inches (10cm) from the wall.
- TEMP: Press the TEMP to turn the unit ON (the temperature will flash 150°F).
- OFF: Press the Off button to turn the unit OFF.
- FAHRENHEIT to CELSIUS: Turn the unit on and press both the TEMP and TIME button
Up and Down ARROWS: By pressing the up or down arrow the temperature will adjust in 5-degree increment in both Fahrenheit and Celsius. Pressing and holding the up or down key the temperature will adjust in 25-dregee increments Fahrenheit or 10-degree increments Celsius. If no temperature is set, the signal light (red light on the left side of the digital display) will flash for 2 minutes and automatically shut off.

- Temperature Range: 150-450°F or 65-230°C
- SIGNAL LIGHT: As the appliance heats to the set temperature, the signal light will blink on and off until it achieves the precise temperature and stop blinking when the set temperature has been achieved (3 to 5 minutes). The signal light will cycle on and off during the cooking process to indicate the precise temperature is being maintained and saving energy dollars.
- TIMER Button: First set the desired cooking temperature. To set the timer press and release the TIME button. The display will flash 00:00. Press and hold the UP arrow to set the desired length of time up to 12 hours. If no time is set, the heat control will operate at the preset temperature until the OFF button is pressed. The digital timer will automatically count down in the display. The temperature or time can be checked at any time during the cooking process by pressing the TEMP or TIME button. Furthermore, the temperature or time can be changed at any time during the cooking process.
- Insert Rice, liquid and desired seasoning. (See guide below.)
- Press the TEMP button.
- Press the down arrow button once to select RIC1 or twice to select RIC2. Display will flash the chosen setting. When flashing stops, heating begins. The unit will automatically heat to a simmer and cook the rice. A countdown timer will appear in the display and then switch to the keep warm temperature of 150°F (65°C) when cycle is complete.
RIC1 – Low setting/shorter cooking time used for smaller amounts of rice. (1-3 cups dry measure).
RIC2 – High setting/longer cooking time used for larger amounts of rice. (4-5 cups dry measure) This unit has a capacity of 5 cups dry measure.
These are general guidelines. Results may vary depending on quantity, type and brand rice selected.
DO NOT EXCEED CAPACITY.
Temperature Guidelines
Low 150°F (65°C) Tenderizing Meat, Sous-Vide Vegetables
- 155°F (68°C) Food-borne bacteria killed, pasteurizing
- 150-160°F (65-70°C) Slow-Cooking 5-7 hours: Beans, cereal grains, stews, steaming
Slow-Cooking 3-5 hours: 170-190°F (77-88°C) Barbecue, appetizers, dips, Sloppy Joes, soft-boiled eggs
Med-Low 175°F (79°C) SIMMER: Stocks, soups, stews, chili, chowder, melting cheese for Fondue
- 180°F (80°C) Sauces, poaching eggs, roasting meat after browning, waterless cooking
- 200°F (95°C) Stewing, braising, quiche, waterless cooking after vapor seal
Slow-Cooking 2-3 hours: 200-220°F (95-105°C) Spare ribs,fruit/vegetable juices, sauces
- 210°F (99°C) Baking; custards, casseroles, hard-boiled eggs
- 220-230°F (105-110°C) Jellies, jams, preserves, candy
- 230-250°F (110-121°C) Eggs; scrambled, fried, omelets, pre-heat for baking
Medium 275°F (135°C) STEAMING: Begin waterless cooking, Bananas Foster, Cherries Jubilee, roux
- 300°F (150°C) Sauté vegetables, hash browns, baking cakes, cornbread, brownies
- 350°F (175°C) Fish, seafood, grilled sandwiches
Med-Hi 375°F (191°C) Stir-fry, deep-fry, pancakes, boil pasta
- 400°F (205°C) Crepes, pan-fry, pan-broil
High 425°F (218°C) Boil, sauté,
- 450°F (232°C) Browning, searing meats, popcorn
|
|
|