Creating a CSV File
Knowledge Base: Creating a CSV File
In an effort to further improve system-wide performance (read: get your newsletters sent faster to more inboxes), we’ve updated our subscriber input utilities. What does that mean? Well, we’ve streamlined the Add Subscribers process, but we’ve also eliminated the Quick Add feature. A heartless move, we know, but a necessary sacrifice for the benefit of improved sending.
So how does one go about quickly adding subscribers now? Don’t worry. It’s still quick. You’ll need to create a CSV (or Comma Separated Value) file, but the process is very simple. When preparing to upload a list of new subscribers:
Paste all addresses into a plain text or .TXT editor (Notepad on Microsoft systems and TextEdit on Apple Systems)
Separate each email address with a line break, ensuring that only one address appear on each line of the document like this:
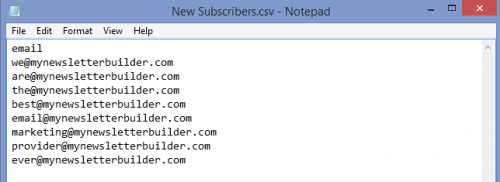
Make “email” the only word that appears on the first line of the document
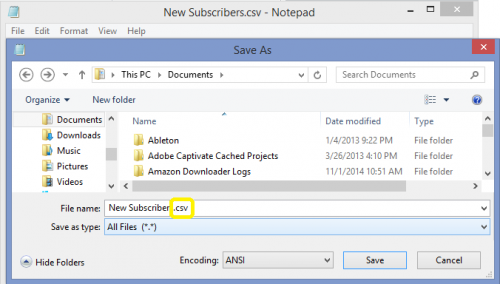
Save the document as a CSV file (This process is different for different applications, but in most cases, you’ll simply need to change the file extension to .csv)
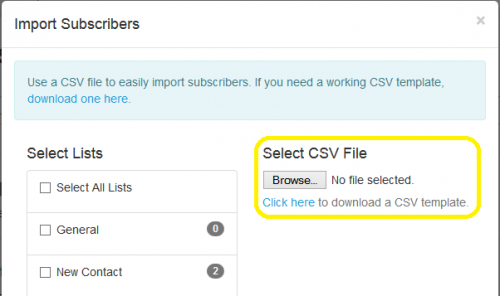
Upload that honker to MyNewsletterBuilder using the CSV uploader tool, which you’ll find on the Import module on the Subscribers page of your MNB account.
As always, if you run into any issues, please contact our excellent support team.
Custom Subscriber Pages
About This Feature
Subscription URLs allows our users to use external webpages for readers to subscribe, opt-in, or unsubscribe from your newsletter. When you include links to these in the Subscription URL section, MNB will forward your subscribers to that page for that action. These are all completely optional, of course - we wouldn’t leave you hanging! If you opt not to use external pages, MNB’s stock pages will be automatically used.
How to Use This Feature
It is up to each user to create their own external web pages. Once you have this page created, you will go to “Subscribers” in the main menu and click “Preferences.” On the Preferences page, click on “Options” in the left side menu. On the Options page, you will see entry boxes for URLs under the title “Subscription URLS.” As always, be sure to click the green save button when you’ve finished inputting your URLs.
You may submit a custom URL for the following subscriber actions: Subscribe, Opt-in, Unsubscribe. Any time a user completes one of these actions they will automatically be directed to your webpage. From there, the rest is up to you!
Best Uses
Custom pages allow you to enhance company branding and recognition. You can use these pages to gather more information about your readers and your email marketing campaigns, which will make your newsletter a greater value to your readers.
Your subscribe and opt-in pages are a prime location for making sure that future readers know what they are in for and set preferences. Give readers a sample of what you have to offer and consider a gift or discount for signing up.
Another item of interest for email marketers is why people unsubscribe. Are they tired of your content? Have they lost interest? Did your newsletters change? Did they receive too many newsletters? Is your content no longer relevant to them? Conducting an exit survey is a great way to find out why people are leaving. Keep your survey short and sweet to increase the likelihood that users will be willing to engage. Sometimes all you need is one request: “Please tell us why are you unsubscribing.”
Sign-Up Builder
About This Feature
This feature enables you to create a customized subscription process for new subscribers to your email marketing campaigns. You can create forms, preview your forms, select email groups for your subscribers to join, restore default settings and choose whether or not to display tokens from this page. Select from a single-step sign-up process or a multi-step sign-up process. You can also create a sign-up form Facebook App. To further customize the look of your multi-step sign-up process, you’ll need to go to Tools → Branding.
If you make changes to the subscription form after you’ve pasted the HTML code to your website, you will need to re-paste the updated code. The code will not update on your website automatically.
How to Use This Feature
This feature is accessed by selecting “Subscribers” on the main menu, then clicking “Sign-up Builder.” You can navigate through the options using the left side “Actions” menu. There are two types of forms to choose from. These are:
One-Step Form: creates a single sign-up form that collects all the information you need without further pages involved.
Multi-Step Form: incorporates a partial form as the initial sign-up form, and navigates the subscriber through a 3-step process hosted on MNB’s servers.
Please note: once you’ve created the form, you can customize (brand) the sign-up process.
[+] Create a One-Step Sign-up Form
To create a single-step sign-up form, make sure that you’ve clicked “One-Step” on the left side “Actions” column.
HTML Snippet
To use the form as it is, copy the HTML snippet at the top of the screen and go. To actually personalize the form, read on. When you are done personalizing your form, you will grab this HTML code (copy it) and use it on your website/blog/where ever you want to put the sign-up form.
Customize
Under customize, you have some fun options. They are:
Style. You can select the colors you want to use for each part of your subscriber form by clicking on the 6-digit color code next to the listed component. You can insert your own color code or use the color selection tool. When you click update, the preview image on the right side will reflect your changes.
Fields. What information do you want your subscribers to give you? Under “Fields” you can choose to display a field, which puts it as an option on your sign-up form; require a field, which means they cannot pass go without giving that information. It’s recommended to use a fairly short, non-invasive sign-up form to maximize your sign-ups. Click update when you’re finished.
Subscriber Groups. What are your readers signing up for? This is where you can determine which subscriber groups they can opt into. You have three options:
- Show. This includes the group as an option on the subscriber form.
- Hide. This hides the group from the sign-up form. This is particularly useful for internal-use-only groups you might have, such as “Deep Pockets” or “Broke Folk”. Customers don’t need to see that.
- Default. Your final option is “Default”. “Default” can be selected in addition to “Show” and “Hide”. If selected with “Show” it shows the subscriber that, in addition to any groups they opt into, they will also be included in the default group(s). If “Default” is selected with “Hide”, then people will automatically be placed in the default subscriber group(s) without their knowledge. Yes, this is legal. As long as they are opting in to your email marketing, you can put them in whatever groups you want &emdash without telling them.
[+] Create a Multi-Step Sign-up Form
HTML Snippet
To use the form as it is, copy the HTML snippet at the top of the screen and go. To actually personalize the form, read on. When you are done personalizing your form, you will grab this HTML code (copy it) and use it on your website/blog/where ever you want to put the sign-up form.
Customize
First, you want to select the form style. You can choose from standard, basic, image, or text link forms.
Once you’ve selected the form style, the customization options available for that form style will pop up in the “Options” box. You can preview your customized form on the right side of the screen. Customization options are available for each form as follows:
Standard:
- Select font style
- Personalize the title
- Customize the width (we recommend not going over 300 pixels wide)
- Select the color scheme that you like
- Customize the colors using the fields below “color scheme”. To do this, you can either input the 6-digit color code, if you know it, or click in the field where the color code is located and use the color slider tool that appears.
Click “Update” button to save your awesome customization.
Basic:
When you’ve selected, click “Update.” Pat yourself on the back. That was easy.
Image:
- Select from the pre-made buttons
Click “Update” and take a break. You just earned it.
Text Link:
- Select the font
- Create your own title (or use the one that is there)
- Select the text color and highlight color using a 6-digit color code or by clicking the field where the current color code is located and using the color slider that appears.
>Click the “Update” button. You get a gold star.
But What about the other sign-up forms in this 3-step process?
Once you’ve customized the multi-step form, its a good idea to customize the pages that subscribers will navigate through to sign up to your campaigns. In the main menu, select “Tools,” then click "Branding" to get started.
[+] Create a Facebook Sign-up Form for Your Fanpage
Best Uses
Using sign-up forms is the easiest hands-free way to gather new contacts &emdash meaning new leads. Short, single-step sign-up forms are often the easiest way to ensure subscriber follow-through. However, using buttons or text links present a more clutter-free method of directing people to your newsletter. Which ever you decide, make it sing with your brand and personality. If you create a multi-step form, we highly recommend proceeding directly to "Branding" (under "Tools")to ensure continuity in your branding.
Subscribers: Confirmation Emails
About This Feature
The confirmations system allows you to create a customized automated confirmation email to new subscribers. You will also be able to preview your newsletter and restore default settings from this page.
How to Use This Feature
To access this feature, select “Subscribers” from the main menu and click on “Confirmations.” This will take you to the Confirmation landing page.
[+] Create Confirmation Email
You can create your confirmation newsletter using the steps in the left-hand menu.
Note: Please hit “save” after each step; we are currently unable to turn back time and retrieve lost content.
1. Email subject. Enter the subject-line for your confirmation email. Convey, in as few words as possible, that the purpose of the email is to confirm their subscription.
2. Introduction. Introduce yourself and invite the reader to confirm their subscription with you. It is best to enter both HTML and Text Content so that the email will render well for most readers.
3. Close. Provide any further information about yourself or your newsletter that you want to have included in your closing.
4. Confirm. The text you enter here will show up when subscribers hit the link to confirm their subscription.
Preview Your Confirmation Pages
To see what your email or confirmation page will look like, hit “Preview” under “Actions” on the left sidebar while open to the page you wish you view. The Preview Action will open the current page as it will appear to users in a new window. If you are creating or editing your form, be sure to hit “save” before previewing.
[+] Restore Defaults
Restore defaults will reset your Confirmation back to the default settings. This removes any customizations you’ve made.
Best Uses
A double-opt email subscription ensures that every subscriber to your newsletter has specifically and consciously chosen to be there. That’s an empowered position to be in!
You might consider including the following in your confirmation email:
- Contact information
- A description of what your newsletter contains
- A reminder of subscriber options
While you can include links, images and more in your opt-in email, make sure you’re only giving them a small taste of what’s to come. The real goodies should arrive with their first newsletter.
Subscriber Preferences
About This Feature
Preferences allows you to control settings for your what information is collected from your subscribers during the sign-up process, how groups are displayed to subscribers, and the subscription processes.
How to Use This Feature
Select "Preferences" under "Subscribers" in the main menu. You can navigate the preference settings by using the menu in the left column.
[+] Step 1: Email Page
This is the first page that a new subscriber sees when they sign up from your email list. Under "Header URL", input a URL to make your logo or title a link. This can be to your homepage or another page. Next, create a title for the first step of the email process, or leave the default title in place. Finally, create a description of what you want the subscriber to do. The subscriber will be inputting their email address on this page.
When you're done, make sure you click save. You may also click "Preview" from the left-side menu to see what it will look like.
[+] Step 2: Groups
This is the page where subscribers will select the email group(s) they want to sign up for. First, create a title for this step of the subscriber process. Next, create a description. You can use the title and description provided or create your own. Finally, you can determine which subscriber groups you want displayed on the form. There are three options:
Show: the subscriber category will be displayed in the sign-up process.
Hide: the subscriber category will not be displayed in the sign-up process. This is ideal for internal-use only categories.
Default: whether you show or hide the category, you can select any amount of categories that people will automatically be placed into. Remember to click "Save"!
[+] Step 3: Data Fields
This is where you determine what subscriber data you want to collect. First, create a title for this page. Next, create a description. You can use the default title and description. Next, you need to select the standard fields that you want on your subscriber process. They will be required to give an email address; you can require additional fields as well. If you do not want to include a field in your signup process, uncheck “display”. Now you can create custom data fields for any data you wish to collect that was not included. Click "Save" when you are finished.
[+] Step 4: Thanks Page
This is where you thank your subscribers for signing up to your newsletter. Select the title for your thank you page, and then write your message. You can use the default title and message, or create your own similar message. Once you’re finished, click "Save".
[+] Step 5: Options
During this step, you create system responses to different actions from your subscriber.
Welcome Newsletter: this lets you select a newsletter to be automatically sent to new subscribers when they confirm their subscription. Select a newsletter for this from the drop-down box, or select "None" to disable this option. Tip: Create a newsletter for this purpose.
Subscription URLs: input a URL and MNB will direct subscribers to that page after they complete one one of the listed actions: subscribe, opt-in (confirms subscription), unsubscribe. To use the default "thank you" page for any action, leave the field blank.
Notifications: this lets you choose whether to be notified via email when a new person subscribes, or when someone unsubscribes. Both of these options are selected by default.
Group Selection: when an individual subscribes to your email marketing newsletter through a newsletter, use these settings to choose which categories they will be subscribed to. They can be subscribed into a pre-selected default category, the category the forwarded newsletter was sent to, or both. To pre-select a default category, go to Subscribers → Sign-up Builder.
Once you’re finished, click the green save button.
[+] Actions
Preview. Click preview to see your subscription pages. A second window will appear that will guide you through your newly created subscription process. You will need to have pop-up blocker set to allow pop-ups from MNB. Don’t worry, we promise not to install pop-up ads.
Restore Defaults. Warning! pressing this button will undo any customization you have ever done to your subscriber forms. Consider it a red button and please steer clear. Unless of course, you want to reset your subscriber preferences to the default settings.
Best Uses
The preferences feature helps you customize and tailor your email subscription process. Choosing how much information you require is a balancing act. Asking for too much may scare away potential subscribers. Getting too little information makes it difficult to sort and identify subscribers through demographics. Also, consider including a description of the subscription options if you have more than one.
You can hide and reveal specific groups based on which you intend to be available for subscribers to opt into and others which you intend to intentionally and selectively populate. In addition, having an automatic welcome newsletter empowers you to immediately engage with new subscribers.
Subscriber Search
About This Feature
Locate individual subscribers within your account, and build lists based on selected criteria.
How To Use This Feature
Go to the Main Menu and click “Subscribers.” Select “Search” from the drop down menu. Here you can search subscribers based on their group or confirm, copy, and export subscribers.
[+] Search
You can search for a subscriber by typing in an exact or partial phrase into the search box and selecting the group you wish to search.
[+] Organize Search Results
To sort your results by email address, first name, last name, or subscribe date, click on the title in the header row of the subscriber list. Use the arrows beside the individual phrases to switch between ascending or descending order.
To organize subscribers, check the box next to "Email" at the top of the list to select all addresses or select each address individually. After making your selection, select from the menu on the right side of the page:
Confirm: send a confirmation email to selected subscribers prompting them to confirm their subscription (double opt-in)
Export: downloads a CSV file of selected subscribers
Copy: copy selected subscribers into another category
Move: move selected subscribers from one category to another
Delete: delete selected subscribers from individual categories
Edit Subscriber Data
To edit subscriber data, click on the subscriber email address. A pop-up box will appear with multiple fields available to add or change subscriber data. Click the green save button at the top of the screen when you are finished.
Best Uses
Sorting your subscribers and adding them to unique groups helps you to better target market your email marketing communications. You can also use this feature to help structure your email marketing campaigns and to locate a subscriber or edit subscriber information.
Update Existing Subscribers
About This Feature
This page lets you update existing subscriber information. Fill out a CSV (Comma Separated Value) file with the information you would like to update and submitting it. It’s as easy as that!
How To Use This Feature
- Go to Subscribers on the main menu bar and select “Update” from the drop down menu.
- You will need to upload a CSV file with the correct column headings. We recommend downloading our CSV template, as it is pre-populated with the headings that our system recognizes. The download link is found at the top of the screen.
- Input the updated subscriber information in the CSV file and save the document, preserving the CSV format.
- Warning! To preserve existing subscriber data in the system, check the box next to “Ignore Blank Fields” on the Subscriber Update page. When this is not done, the system will overwrite your existing subscriber data with blanks. Nobody wants that.
- On the Subscriber Update page, click the “Browse” button to search for and select your CSV file.
- Finally, click "Upload File" when you are ready to upload. To check the progress of your upload, visit Reports → Activity.
Note: A CSV file is a spreadsheet that opens in Excel, Numbers, and similar spreadsheet programs. Your CSV file should have a heading row in the first row, and subscriber information listed as columns under each respective heading. The order and headings must be formatted precisely. Again, we highly recommend downloading the CSV template to use as a guide. This is located on the Add Subscribers page. It’s just easier that way.
Best Uses There are many reasons why you might need to update subscriber information. Perhaps a company you email has new email addresses or several of your contacts have recently updated their mailing address with you. Keeping subscriber information accurate and up to date is an important part of list hygiene (read: it helps keeps your email out of the spam folder). It’s easy if you follow the directions above. As always, feel free to contact support if you need help.
Add Subscribers
About This Feature
MNB offers three options for adding subscribers to your account. This feature is vital to growing your email list successfully. Adding new subscribers can be done in large batches or a few at a time.
How To Use This Feature
From the main menu, select “Subscribers,” then click “Add.” Under Step 1, select the subscriber groups) you want to add contacts to and use one of the following functions from Step 2:
[+] Quick Add
- Simply copy your email list and paste it into the box and click “Add.”
- Alternatively, you can type the address into the text space and click “Add.”
- MNB will also do its best to automatically single out email addresses contained within other text.
[+] Form Add
- This aspect allows you to input detailed subscriber data while adding subscribers one at a time.
- Click the “Form Add” button. You should see a pop-up form with subscriber detail fields.
- Check the box for the subscriber category you want to add the subscribers to (such as the “General” category).
- Enter their email address and any other subscriber details you like, and click “Save.”
Note: alternatively, at the bottom of the popup form, there is an option that says, "Update with vCard". Click “browse”, select your vCard (.vcf or .asp) file, and click “upload”.
[+] Upload Detailed File
- With this feature, you can add subscriber addresses from a Comma Separated Value (CSV) file. This is the only file option available for this feature.
- We recommend that you download our CSV template to ensure compatibility. The download link is available above the "Browse" button.
- Copy subscriber data from an existing spreadsheet into the CSV file. This information may be extracted from another email service as a different CSV file, or it can be in any spreadsheet format.
- To update existing subscriber data by uploading a CSV file, select “Update Existing Subscribers.”
- When you upload the file you will be taken to a second page that will show you if your upload is being processed, was successful, or if there is an error.
Most spreadsheet programs and email programs have an option to save/export a CSV file. You can check the help section of your email program or contact our support team for direct assistance with most programs.
Best Uses
Choose the update method that is best for your purposes. If you have a long list of email addresses without any additional subscriber details, the easiest thing to do is copy and paste your entire list into the “Quick Add” box. If you have spreadsheet with email address with subscriber information included, uploading a CSV file is a more efficient option. If you only have a few contacts with details to add to your list, or you want to upload vCards, adding via “Form Add” and entering their subscriber information is the preferable route.
Fun Fact: MyNewsletterBuilder (MNB) automatically removes duplicate addresses from the same subscriber category. Upload subscribers to multiple groups, and send confidently, knowing that subscribers will not receive multiple copies of duplicate addresses automatically.
Subscriber Groups
About This Feature
The Groups page lets you view, add, and edit subscriber categories. These categories are your different mailing groups. There is no limit on how many subscriber groups can be in an account. Subscribers must be in a group in order for you to send to them. A single subscriber can be in multiple groups at a time, and will only count toward the subscriber quota once. They will also only receive newsletters once when you send to multiple groups.
How to Use This Feature
Click “Subscribers” on the Main Menu. Select “Groups.” Use this feature to access, edit, create, and export subscriber groups.
[+] Exporting Groups
Export Active: Downloads a
CSV file of subscribers currently active within your account.
Export Deleted: Downloads a CSV file of subscribers you have specifically deleted from your account.
Export Unsubscribed: Downloads a CSV file of subscribers that have unsubscribed or have hard-bounced.
[+] Adding a Group
Create a name and description for your subscriber group. Use a subscriber-friendly name, as it will be viewable by your subscribers on certain sign-up forms. The description field is optional.
[+] Manage Your Groups
To edit or view the individual subscribers within an existing category, click on the group name which will take you to a detailed Manage Group page which offers these additional actions: Confirm All, Copy All, Export All, and Add Subscribers.
Confirm All - sends a confirmation message to your email subscribers.
Copy All - allows you to copy the subscribers from one group into another group.
Export All - downloads a CSV (comma separated values) file of the subscribers in that group.
Add Subscribers - brings you to different page where you can add new subscribers.
[+] Make Edits to Groups
Make edits to the group using the icons located on the right side of each subscriber group.
Edit - allows you to edit the group name, description, and subscriber options.
Clear - removes all subscribers from the group without deleting the group.
Delete - delete this group record completely.
Note: when deleting subscribers from your account, your total subscriber count will not reflect the change until your account refresh date (found under Account > Quota).
Best Uses
Confirming subscribers in email groups is an email marketing best practice. The double opt-in ensures you only have subscribers that want to be part of your list.
Having multiple subscriber groups helps to better focus your email marketing efforts, sending relevant content to those who are the most suited to receive it.
You can download the results of clicks or opens from one campaign and create a new subscriber list by uploading the downloaded CSV file into a new or existing subscriber group.
Include options for frequency of sending and type of message on your subscriber sign up form. This avoids unsubscribes by empowering your readers to select what they want to receive.
Remove Subscribers
About This Feature
Subscribers can be removed from your email newsletter on both a permanent and a non-permanent basis. You can remove subscribers from one or all of your groups either by copying and pasting their email addresses into Quick Removal or by uploading a CSV file.
How to Use This Feature
To remove email marketing subscribers from your account click "Subscribers” in the main menu, then select “Remove.” The first step will be choosing your removal methods. This is very important. There are three different steps for removing subscribers from your account.
[+] Step one: select the type of removal
- “Remove from Subscriber Groups” is non-permanent removal.
- "Delete Permanently" (unsubscribe) is permanent, forever, and cannot be undone. Permanently removed subscribers cannot be added back to your account and will be ignored if you try to upload them using your control panel.
[+] Step two: Select the Subscriber group to remove from
Select the Subscriber group to remove from, if using non-permanent removal. Check the box(es) next to the name of the subscriber group(s) you are removing the contacts from. Note: permanent removals do not require or allow you to select specific groups.
[+] Step three: Remove addresses
There are two methods to removing the subscriber addresses. You can use “Quick Remove” or “Remove from CSV.”
To use Quick Remove:
- Copy and paste email addresses into the text box. You can separate the addresses by commas, spaces, semicolons, or line breaks.
- Now click “Remove.” In a few moments you’ll see a message letting you know the request has been completed.
To Remove from CSV:
- To remove subscribers using a Comma Separated Values (CSV) file, you first need a CSV file with the correct headers. A CSV file is a spreadsheet document saved in a CSV format. The CSV download link is located above the "Browse" button.
- Open your CSV file and copy your subscriber's emails into the correct columns. Make sure to save it again as a CSV file.
- On the Subscriber Removal page, click “Browse” to locate your CSV file. Next, click “Upload.”
- Monitor the progress of the removal by clicking “Reports” on the main MNB menu. Select “Activity.” There will be an upload/error report for the file you uploaded.
Special Note: MyNewsletterBuilder (MNB) keeps a 30 day record of ALL deleted, unsubscribed, and otherwise permanently removed addresses.